Welcome to the Stampin Friends Blog Hop!
We are a group of worldwide paper crafters who share their creations every third Thursday of the month. This month's theme is Birthday Bash. If you are following along the hop, you have arrived from Maureen's blog. If you get lost along the way, you can find a list of Blog Hoppers at the end of each blog.
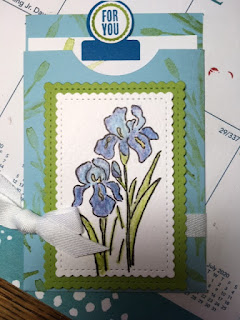
Here are the projects I created for this month's hop: a card and a gift card holder.

I am an avid flower gardener with several beautiful iris plants in my yard. When I saw the Inspiring Iris stamp set in the Stampin' Up! 2020 Mini Catalog, I couldn't resist!
Here's what you need to make the card and gift card holder:
Cardstock:
Balmy Blue 4 1/4" by 10 1/2" Scored at 5 1/2"
Pacific Point 4 1/4" by 5" and a scrap to fit the smallest stitched rectangle
Granny Apple Green 6" x 5" ( this is enough for both projects)
Watercolor Paper 3 1/2" x 4 1/2" (you will need two of these to make both projects) and 4 1/4" x 1"
Inks:
Granny Apple Green
Pacific Point
Basic Black
Stamp Sets:
Inspiring Iris
Varied Vases
Dies:
Stitched So Sweetly set--the three largest scalloped stitched rectangles
Stitched Labels set--scalloped edgelit
Stitched Rectangles set--smallest
Other:
Classic Label Punch
Watercolor pencils (pacific point, daffodil delight, rich razzleberry)
Blender Pen
Die Cutting
1. Cut two granny apple green scalloped rectangles with the second largest die (you'll need one for the gift card as well). These will be used as mats for the two iris images. Set aside.....
2.Cut one small stitched rectangle out of the pacific point scrap. Set aside.....
3. Center the largest scalloped rectangle die on the shorter end of the balmy blue card stock and run it through the Big Shot creating a "window."
To create a mat under the "window," adhere the pacific point cardstock to the inside of the cover, over the top of the "window."
Turn it back to the front side, center the second largest scalloped die in the window area, and run it through the Big Shot.
This window is the exact same size as the green mat for the iris image.
4. Place the scalloped edgelit from the Stitched Labels die set along the edge of the 1" watercolor paper piece and run it through the Big Shot. Set aside.....
Stamp:
1. "Birthday Wishes" on a scrap of water color in Pacific Point ink.
Then punch it out with the Classic Label Punch and adhere it to the Pacific Point stitched rectangle. Embellish with a twine bow.
2. "Hoping your day blooms with happiness" in the center of the watercolor paper scalloped strip.
3. Iris image in black on the watercolor paper. Do this twice since you will need one for the gift card envelope. When the image is dry, color the flowers with watercolor pencils and blend. Center the third largest scalloped rectangle die over the iris image and run it through the Big Shot.
Construction:
Adhere the flower image to the Granny Apple Green scalloped rectangle with dimensionals. Apply Tombow to the back of the green piece. To have correct placement, shut the card and put the green piece in the window opening and adhere.
Adhere the inside greeting.
Adhere the front message.
 |
| Inside view |
For the gift card holder, I CASED a Pinterest post by Chris Slogar of Buckeye Inklings. She has an excellent YouTube video with all the directions for her circle tab gift card holder and envelope.
I have used the same color scheme, cardstock, and ink colors as my birthday card.
The base of the envelope is 4 1/4" x 9 1/4". Score 1/2" along both long sides. Rotate and score at 5". After cutting and scoring the pocket holder, I used the leaf and stem stamp to create some background interest. Use a circle punch to cut a "finger hole" at the top of the front section.
.
The insert is 3" x 5 1/2". Score at 4 1/2" and fold up to make the little pocket. Decorate it as desired. Attach a circle pull tab at the top. The sentiment is from the So Sentimental stamp set from Stampin' Up!
I hope you like my projects. This is my first blog hop, so I am learning as I go. Feel free to comment below with constructive feedback on how I can improve my format and content. Thanks!! Don't forget to hop around the other blogs and see what everyone else is making for Birthday Bash cards and projects--lots of inspiring ideas to get your creative juices flowing!
1. Rachel Rife
2. Kim Lamos
3. Teri Pocock
5. Jo Blackman
7. Katja Ettig
9. Kim Quade
10. Heidi Collins
12. Jean Beaulieu You are here!
13. Anne Marie Hile
14. Barbara Welch
Shop 24/7 at my online store!
My January host code: MPJXJNKR


Beautiful card! Thanks for sharing!
ReplyDeleteLove your projects - beautiful - I'm going to have to try a card like that! Glad you're in the hop!!
ReplyDeleteBeautiful projects!
ReplyDeleteI'm loving your beautiful card and gift card holder Jean! xx
ReplyDeleteLove your projects, Jean! I especially like the gift card holder..you are inspiring me to get my blog going.
ReplyDeleteJean, your projects are lovely! Wow! I also love the color combo you used to showcase this stamp set. That pop of green really makes those gorgeous flowers stand out. It was so fun hopping with you this month, thanks for the inspiration!
ReplyDeleteI love your projects, Jean. Your flower themes are so pretty and wonderful. Thank you also for sharing your instructions and measurements!
ReplyDeleteGreat projects and clear instructions, thank you for sharing x
ReplyDeleteLove iris' too. They are so beautiful and your card is beautiful too.
ReplyDeleteBeautiful projects, flowers are one of my favourite things to stamp, tfs
ReplyDeleteBeautiful card and great instructions. Thanks for sharing.
ReplyDelete