Showing posts with label spritzer. Show all posts

Thursday, November 19, 2020

Stampin Friends 2020 November Blog Hop

 Stampin Friends 2020 Happy Holiday/Winter November Blog Hop


Welcome, Crafters!  

Can it be November already?  This is our last hop of 2020!  This was my first go at blog hopping, and I have learned so much.  Thanks, Stampin Friends, for all your help along the way.

This month's theme is Happy Holiday/Winter, and we are sharing some really special cards and 3-D projects with you.  If you are following the blogs, you  have come from Sue Vine's blog.  At the bottom I have included a list of the bloggers.  After mine, you will find a link to Kim's blog. Check out her wonderful creations!

I grew up in a little town in northwest Montana (Eureka) called the "Christmas Tree Capital of the World."  My dad was a Christmas tree "farmer."  He worked throughout the year planting new trees, pruning the young trees, and preparing the older trees for harvest.  He always wore a red and black plaid coat in the woods, and whenever I see buffalo plaid I think of him. I created this card and project with him in mind.

Here they are (card and covered junior legal pad notebook):

I have been making (and sending!) Christmas cards for more than 25 years and have an extensive collect of holiday stamps.  It's hard for me to part with any.  Every year I tell myself, "No new stamps this year.  Use the ones you have."  I DO use a lot of them, but... Stampin' Up! keeps producing new stamp sets that are irresitible! I have used five sets (see below for a list) for my card and project.  

What I Used: 

Base:  Shaded Spruce card stock 8-1/2" x 5-1/2" scored and folded at 4-1/4"

Mat:  Designer Series Paper (In Good Taste) 4" x 5-1/4"

To get the buffalo check, I used a piece of Basic Black card stock (5-1/2" x 4-1/4") and one of the dies in the Best Plaid Builder die set.  I adhered it to a Real Red (5-1/2" x 4-1/4") piece.  I trimmed it with a Stitched Rectangle die.

Focal Piece:  Shaded Spruce card stock, Whisper White card stock, and Stitched Nested Labels dies, Stampin' Write Markers

Greeting:  Rustic Retreat stamp set, Stitched Shapes dies


I was going for a soft country look, so immediately I thought of the Snow Front stamp set.  I wanted the chimney to stand out on the log cabin brown, so I decided to try a technique that I hadn't used in a very long time--using markers to get multiple colors on the stamp.


Color each part with a marker, give the block a little huff of breath to remoisten the inks, and stamp.  I love the soft watercolor effect.  (This is a good technique to keep in mind for stampers with only a few sets of ink pads.)  Once the whole scene was stamped, I used the Stitched Nested Labels dies to create the shape and adhered it to a Shaded Spruce piece.  To give the scene a little pop, I mounted it on the card using Stampin Dimensionals. (One of my all time FAVORITE products!)

Can you tell that I love the stitched look on my cards???

I used the brand new (adorable!!) Curvy Christmas stamp set on the inside:


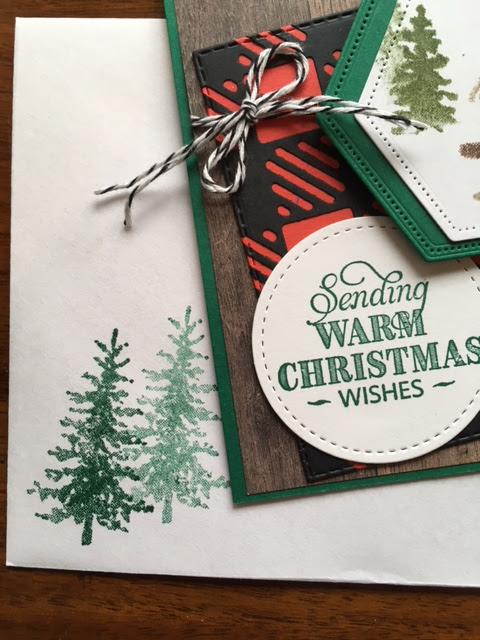
I don't like naked envelopes!  For this envelope, I used the stamping off technique.  Stamp once with full strength ink and stamp a second time without reinking.  (Another technique for stampers with a limited number of ink pads.)

I used the same color scheme and focal point on this covered notepad.


The inside has a pocket on the left and a junior legal pad on the right. 
I have seen and tried many variations of this notepad cover, but I especially like Jessica Taylor's (Ink It Up With Jessica) version and have adapted it a bit here for this project.

What I Used:
Base:  8" x 11" Real Red card stock; score at 5-1/16", 5-5/16", and 10-3/8"
Base Pocket:  3-1/2" x 8" Real Red card stock
     Use a 1-1/2" circle punch to punch out a finger notch before taping
Front:
Designer Series Paper (In Good Taste) Panel:  4-1/4" x 7-1/4"
White Mat 
Real Red Panel
Black Panel
Shaded Spruce Scalloped Rectangle (Stitched So Sweetly, a retired set)
Various scraps for branches, pinecones, and tree
White for oval snow scene
In the Woods dies for the Christmas tree, pine cones, and branches
Inside:
White Panel
Shaded Spruce Panel
Strip For Top of Note Pad
Curvy Christmas Stamps

What I Did:
1.  Folded and burnished all score lines and made sure the base of the cover fit around the notepad.
2.  Folded over the 7/8' flap and added a strip of Tear & Tape adhesive along the edge. 
3.  Attached the UNNOTCHED edge of the pocket to the flap. 
4.  Added Tear & Tape adhesive along the top and bottom edges of the pocket piece.

5.  Folded the pocket piece and adhered it to the cover.
6.  Added Tear and Tape strips to the back of the notepad and adhered the note pad to the cover.

  I hope you will continue through my Stampin Friends' blogs to see what they have created this month.  At the end of each blog, there is a place to comment on the posts.  Please do so!  Stay well, be safe, wear a mask, keep the hope of a vaccine by spring in your prayers, and KEEP STAMPING!  Thanks for stopping by!


I have used these Stampin' Up! products:  
Click on the product name to connect with my online "store."  Thanks for shopping with me!


Tuesday, October 9, 2018

Stampin' Up! has Shimmer Paint!!!


I arrived home from Seattle last night (a long weekend trip to visit my son's family in Bothell) to find that the UPS had paid a visit while we were gone.  Yay!  It's always fun to open one of those boxes!

I found a another new favorite from the Holiday Catalog!  Shimmer Paint--LOVE IT!  It's found on page 38--four colors:  Champagne Mist, Bright Copper, Frost White, Vegas Gold.  I bought only the Frost White.  After using it this morning, the other three are on my Wish List. 

I also got the Winter Woods stamp set and In the Woods Framelits which I bought in a bundle saving 10%.  Another favorite already!

A big thanks to Lisa Curcio for her wonderful You Tube presentation:  Three Shimmer Paint Techniques!  I am sharing two of them on my blog this morning.

I stamped two trees from the Winter Woods set in Shaded Spruce on two pieces of Whisper White card stock (2 3/4" x 4") using my Stamparatus.  They are beautiful just as they are, but the Shimmer Paint added a beautiful, subtle shimmer and shine.  My phone camera doesn't show the shine, but it's there!

For one tree I used a sponge dauber:
Shake the shimmer paint jar and listen for the clicking of the shaker inside. 
Dunk the sponge into the LID of the paint jar.
Starting at the bottom of the tree, slide the dauber back and forth working towards the top of the tree.  The ink color will blend a bit.
The dauber can be washed with soap and water and be used again.
Allow the tree to dry, run it through the Big Shot with its matching framelit, and you have a beautiful tree to use for your project.

For the second tree I used a Stampin' Up! Spritzer:
Shake the shimmer paint jar.
Unscrew the top of the spritzer and drop two drops of the simmer paint into the tube.
Add rubbing alcohol to the tube.
Put the lid back on and shake the spritzer well.
Spray the tree.
Allow to dry.
Run it through the Big Shot.  Another beautiful tree!

Both methods were easy to do and the results were beautiful.  The colors vary a bit.  The one closest to the catalog was done with the sponge dauber.

Thanks for stopping by!