Friday, November 25, 2022

November 2022 Stampin Friends Blog Hop--Tags, Bags, and Boxes


Welcome Crafters!

Once a month my stamping friends and I create two projects--usually a card and a 3-D item.  If you are following the blog hop, you may have come from Barb's blog.  Continue on to Steph's blog by clicking her link found at the bottom of my blog. 

This month's theme is Bags, Tags, and Boxes--just in time for the holidays!  I love making all three things.  In October I had a table at a local craft show and nearly all of my bags, tags, and boxes sold out!

Tags
The little box holds 8 of the Let it Snow tags.

Celebrate with Tags Bundle--mittens, white circle, and snowflake


Bag
Small "table bags" for my holiday table containing chocolates for my guests

Here is the template for the bags: (not to scale)


(My "practice box" was a different color than the final product.)
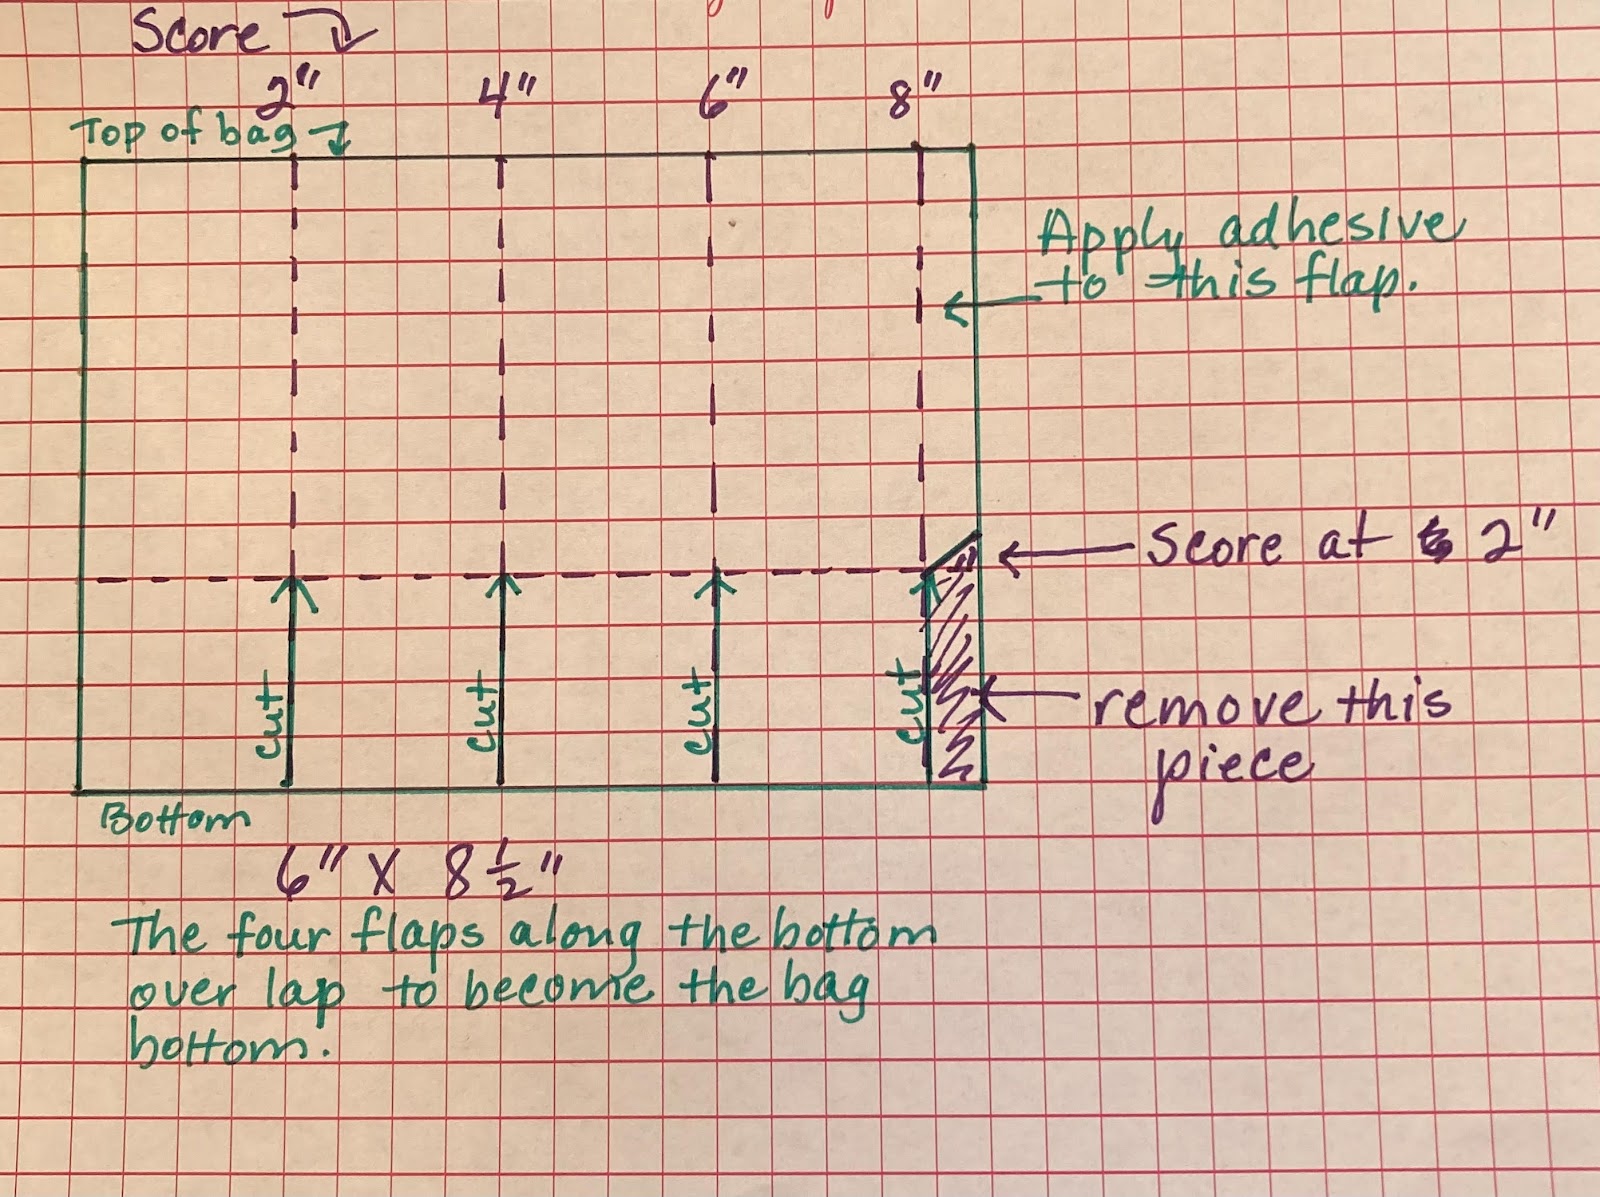
I pinched two sides together creasing the tops.  Then I rotated the bag and pinched in the other two sides, punched a ribbon hole in the top, and wrapped ribbon around the bag. A cute little layered tag completed the bag.  


Super easy to make!


Timeless Tags
Thank you, Sam Hammond (Pootles), for your You Tube presentation.  Find it here: Pootles Advent Countdown 2020 How To Make a Festive Table Gift Bag | Stampin' Up! UK #1 Demonstrator Sam Hammond


Boxes
These cute little (2-1/4" x 2-1/4" x 3/4") boxes were a big hit with my craft show customers.  I could have sold twice as many as I had!  One Ghirardelli chocolate square fits inside.  The red gems on each of my tags, bags, and boxes were rhinestones that I colored red with a Real Red Blends marker.

The template with dimensions and score lines:


These boxes do NOT require any adhesives!  They can be stored flat until needed.


A little ribbon, a greeting, some little twig embellishments (I used white and red pearlized enamel to create the berries.) and they are done.  


Very easy to make!
The craft show was in the middle of October, so I made some of these for Halloween, some for Thanksgiving, and some for Christmas.   

Designer Series Paper (2" x 2" if using a mat) --Boughs of Holly
I made the boxes in a variety of the colors in the DSP:  sahara sand, soft succulent, real red, evening evergreen, and old olive

A big thank you to Julie DeMatteo (Paper Pixie) for her You Tube tutorial found here: (313) Gilded Autumn Gift Box Tutorial - YouTube)   
Her box is a different size than mine, but the construction is the same.

Thanks so much for stopping by.  I hope you found some crafting inspiration.  My fellow bloggers and I love reading your comments, so please take a minute to let us know how you liked our tags, bags, and boxes.

November bloggers:  


Friday, October 28, 2022

October 2022 Stampin' Friends Blog Hop--Thankful For You


Welcome, Crafting Friends!

Once a month my stamping friends and I create two projects--a card and a 3-D item.  If you are following the blog hop, you may have come from Maureen's blog.  Continue on to Tiziana's blog by clicking her link found in the blogger list at the bottom of my blog. 

This month's theme is Thankful for You. Recently a friend of mine did me a huge favor.  I made this thank you card and gift bag for her.


Gift Bag
I used a 5 x 3 x 12 clear pleated cellophane bag that I had purchased for use in a recent craft show.
I lined the bottom with Crumb Cake cardstock that I had decorated with the same patterned paper that I used on the card.
Focal point on bag:
Layering Oval dies
Dies and stamps from the Cup of Tea Bundle
Bag Topper
6 x 6 Neutral Designer Series Paper 
Die cuts and message found in the Ringed in Nature Bundle

Inside the bag is a new tea "mug" and a selection of her favorite kinds of tea.


Card and Matching Envelope

Crumb Cake card stock was used for the card base and covered with
 a 4-1/4 x 5-1/2 piece of Designer Series Paper (love the polka dots!)
Next, I used the largest die in the Scalloped Contours die set for the pretty fall paper background.
Before I adhered it, I used the largest circle die and cut out the lower right-hand corner.
The focal point combines die cuts from the Ringed in Nature Bundle and that cute message from the Hippest Hippo stamp set. The little berry branches were made with dies from the Ringed in Nature Bundle and embellished with white pearlized enamel.  (See the close up below.)


Inside Message--exactly what I wanted to tell my friend!


One of my all-time favorite embellishments this season is a set of Pearlized Enamel Effects--red, white, and silver.  This is a closeup of the berries done in white.  

Thanks so much for taking a peek at my projects this month.  I hope you will leave me a comment below.
I will be back in a month showing projects with the November theme:  Tags, Boxes, and Bags.

Here are the links to the other participants in this month's blog hop.  I hope you will check out their projects for more crafting inspiration.  We love to read your comments, so please take a minute to tell us how you liked our projects.  


Many of the products I used are available from Stampin' Up! Click on the links below and you will be taken to my online Stampin' Up store.  Thanks for shopping with me!

Friday, September 23, 2022

September 2022 Stampin Friends Blog Hop--Say it with Sentiments


Welcome, crafting friends!


Once a month my stamping friends and I create two projects--a card and a 3-D item.  If you are following the blog hop, you may have come from Teri's blog.  Continue on to Barb's blog by clicking her link found at the bottom of my blog. 

This month's theme is Say it With Sentiments.  Sometimes the sentiment says it all!  I chose a sentiment from the Color and Contour stamp set that is dear to my heart.  My sister, who is battling cancer for the fourth time, fell and broke her hip this summer. She has been very brave and strong throughout her illnesses and the accident.  However, once in a while, she calls me when she's down and "cries on my shoulder." I made these projects to help cheer her up.  These sentiments are perfect. 

Here for you now
And in better days come
 
Card

Clean and simple card 

Inside message and another flower


What you need:
Basic White cardstock 8 1/2" x 5 1/2" scored at 4 1/4"
Background designer series paper:
  4 1/4" x 3" Coastal Cabana
  4 1/4" x 1" Orchid Oasis
Focal piece:
   4 1/4 x 3 1/4" Orchid Oasis mat
   4 x 3" Basic White
Flowers: two 2 1/4 x 4 1/2 pieces of white cardstock

Instructions:
1.  Stamp two blue flower outline stamps in full strength Orchid Oasis ink.
2.  Stamp the inside of the flowers with the same ink, but this time "stamped" off so that it is a lighter shade.
3. Use a Daffodil Delight Blends marker to color the center.
4. Make two more flowers using the same process with Coastal Cabana ink.
5.  Use a die cut tool and the flower die to cut out the flowers.
6.  Stamp the leaf outline in Pear Pizzazz ink and fill them in with Granny Green Blends marker.
7.  Layer three flowers on the front and use the fourth one on the inside.
 
Treat Bag
 
Nothing like caramel, chocolate, and a good cup of coffee to cheer her up!

This Peekaboo Treat Bag from Stampin' Up! holds a piece of candy and a gift card for her favorite coffee cart.  I used the Mini Pocket Envelope die set from Stampin' Up to make this cute gift card holder.  There are even dies in the set to make the bow! The sentiment is found in the Happy and Heartfelt stamp set. The oval die is part of the Mini Pocket Envelope die set. I also made a little note card to include with the card.


Gift card holder (close up)
Thanks for stopping by.  I hope you continue to follow the Hop and click on my friends' links (listed below) to see their awesome creations!  We love it when you leave comments!