
Welcome, crafting friends!
Once a month my stamping friends and I create two projects--a card and a 3-D item. If you are a "paper hoarder" and have trouble cutting into pretty paper like ME, this month's hop theme, It's All About the Paper, is for YOU! We'll be showing projects that show the versatility of using pretty patterned paper. The paper is the star of the show! You could adapt our projects with any of your own beautiful paper.
You will find a list of all the bloggers at the bottom of my post.
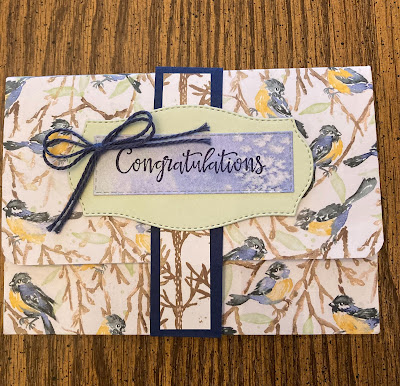
Here are my projects--a double fun fold congratulatory card and a matching pouch containing a set of five thank you cards and matching envelopes. I used patterned paper from the Ringed with Love set of paper--free with a qualifying order of $50 or until the end of August.
 card | |||||||||
 These are the two sides of the sheet of 12 x 12 of patterned paper I used. Sometimes I have a hard time choosing which side of pretty paper to use. With this card I was able to show both sides!    How to make the double fold fun card:1. Card base: night of navy cardstock 5 1/2" x 6 1/4" and score at 2". 2. Inside: soft sea foam cardstock 5 1/4 x 8" and score at 4". 3. For the narrow front flap, cut dsp*********and mat**** 4. For the inside, cut TWO pieces of patterned paper 3 3/4" x 5". 5. Decide on a front greeting and an inside greeting, stamp them on white cardstock or directly onto the patterned paper, cut them, and mat them. You will need TWO die cut (or hand cut) shapes (one for the front and one for the inside greeting) and TWO mats. 6. Adhere the pale green piece so that the folded edge is on the RIGHT side leaving a small margin on all sides. 7. Adhere the patterned paper pieces to the pale green piece. 8. When the card is closed, the front greeting covers the inside greeting. Adhere the inside greeting FIRST so it will be easier to line up them up exactly. 9. I left the inside blank as I plan to write a personalized message to the recipient. How to make the thank you cards:The front of the thank you card shows one side of this beautiful paper and when the card is open, the other side of the paper is showing. What a great way to show both sides of pretty paper! The card base--7 x 5" scored at 3/4" The front of the card is a piece of pretty paper measuring 3 1/4 x 5" Stamp the thank you in Night of Navy ink.  Place the patterned paper on top of the soft sea foam piece leaving an even border on the top, bottom, and right side. Adhere it to the underside of the 3/4 flap of the green piece. Here's a tip to make sure the front and back piece are lined up perfectly. Turn the card base upside down, put the blue patterned piece on top and put the pieces in the corner. I used my scoring tool, but use whatever you have. Open the flap, apply adhesive, close the flap onto the blue piece.   Wrap some twine around the pale green "spine" section and it's done! A quick and easy to make a set of cards. (I made five cards.) I used the same paper to decorate the flaps of the envelopes.  How to make the clutch:Cut the patterned paper to 11 x 11" Score at 2 3/4" and 8 1/4" Rotate the patterned paper 90 degrees and score at 2 3/4", 3 1/2", 7 1/2" 8 1/4" I have seen several how to videos on how to make the clutch, and I found the one done by the Paper Pixie very easy to follow. Here is the link for her video: (219) A2 Card Set Gift Pouch Tutorial - YouTube Her directions are for an A2 card pouch. I changed the sizes to notecard size (3 1/3" x 5") for my project. Thanks for stopping by. Leave a comment below to let me know what you think of my projects. Then click on Barb's link to find more crafting inspiration. Blog Hop Participants:
These are some of the projects I used in my projects. Click on the link to shop with me. |


 | |||
 | |||
 |
")
")
 Designer Series Paper")


