
Welcome, Crafting Friends
My Stampin Friends and I publish a Blog Hop once a month following a theme where we showcase a card and a 3-D project. If you are following the Blog Hop, you may have come from Barb's blog. Aren't her projects super? You will find a complete list of the Stampin Friends and their blog links at the bottom of my post.
This month's theme is Give Thanks.
It's time to celebrate and give thanks to special people in our lives. Here in the US, we celebrate two holidays in November that fit this theme--Veteran's Day (Nov. 11) and Thanksgiving (Nov. 25) I am sending a big thank you to all our American service men and women--serving now or retired--who have sacrificed or our country. For my projects, I chose to honor and thank a very special Army veteran--my husband of nearly 50 years.
I had so much fun making this Veteran's Day card and the little Thank You for all You Do treat box! I have used a variety of stamp sets and dies, some old, some new, that fit him perfectly! Items in the current catalogs will be listed at the bottom of the blog.

Patriotic stars and stripes in red (Real Red, white, and Blueberry Bushel, a retired color)
(Quilt Builder die set--retired)
Grateful (Sparkle of the Season)

Star Blast dies (retired)
Inside message (Inspired Thoughts)
Here is the little treat box (3" x 3" x 3/4") I made for him. I am going to fill it with cherry flavored Lifesavers candies.

The sentiment and anchor stamps are from the April 2018 Paper Pumpkin kit.

Thanks (April 2018 Paper Pumpkin kit.)
Thank You (Pansy Patch)
The Little Things...(Pansy Patch)
Stars (Curvy Christmas)
Thanks to Julie DiMatteo (Paper Pixie) for her You Tube box making video. (Title: Poinsettia Box 9/18/20)
Directions:
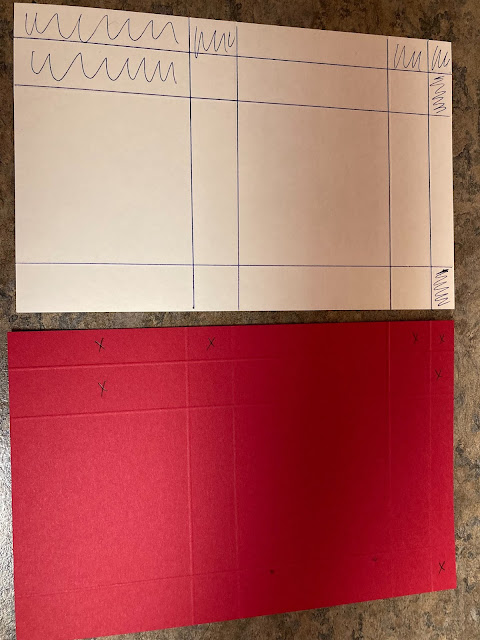
1. Cut cardstock to 5 1/2" x 8 1/2"
2. Score on the long side at 3 1/8", 4, 7 1/8, 8"
3. Rotate and score on the short side at 7/8", 4, 4 7/8"
When making a project like this, I always make a template for my file. Here is the template showing the sections that I will cut off alongside the piece of scored cardstock. I marked the sections of the cardstock that will be trimmed off.
4. Fold and burnish on all the score lines.
5. Cut out the marked sections.
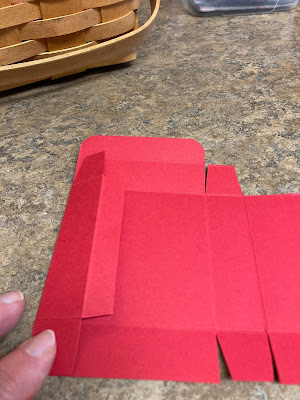
6. On the long edge cut on the three score lines stopping at the horizontal score line creating tabs.

I like to fold the sides under and out of the way when I miter the sides of the tab.

8. Another tip: put the cardstock piece over the top of the original template before continuing to make sure you have cut correctly. The remaining piece at the top will be the tuck-in lid for the box. Round the corners for easy closing.


10. To adhere the sides, fold in like so:
11. Put glue on the 1/2" flap.

12. Now fold the right side over to meet the flap with the glue.


For the bottom:
Apply glue to side panels, and the back panel. Then fold front panel over the back panel. The liquid glue gives some "wiggle" time to work the corners in place.

Top view:

Side Views:

(Pansy Patch)

(Many Messages)

(Layering Circles dies, Classic Label punch--retired)
Thanks for stopping by. I hope you comment below and let me know how you liked my projects. Please continue on to see what Maureen has made. You will find lots of paper crafting inspiration in her blog!
- Barb Pfeffer (Canada)
- Jean Beaulieu (US) You are here.
- Maureen Rauchfuss (USA)
- Steph Jandrow (USA)
- Tiziana Milano (USA)
- Teri Pocock (UK)
- Heidi Collins (USA)
- Melissa Thomas (USA)
- Jo Blackman (UK)
Product List--If you see a product you'd like to purchase in the list below, simply click on the product name and you will be sent to my online "store."
 | ||
 |  |  |
")
")


Great idea to fill with cherry lifesavers!
ReplyDeleteThank you!
DeleteSo fun and festive
ReplyDeleteThank you!
DeleteWhat a fabulous take on the theme of thanks!
ReplyDeleteThese are really nice - I'm all about the red/white and blue. Love the card (you are a quilter at heart) and the box. TFS :)
ReplyDeleteThanks, Maureen!
DeleteLoving your projects Jean. Love the idea of having the extra sentiment inside the lid!
ReplyDeleteThank you, Teri!
DeleteI love what you have done with that card and the box is really cute too, thank you for sharing x
ReplyDeleteThanks, Jo!
DeleteLove your projects and what fun it must have been to get out all the different stamp sets and play!
ReplyDeleteGive your favorite veteran a hug for me!
Thanks, Paula! I will give him a hug for you when he gets back from hunting with Steve, Vince, and Sean on Monday.
ReplyDelete