
Welcome!
It's time for my Stampin' Friends and I to share our latest cards and 3-D projects. Our theme this month is: All About Paper. Who doesn't love to craft with pretty patterned paper? (I admit to being one of those paper hoarders who can't bear to cut up a pretty sheet of designer paper!) If you are following the blog hop, you may have come from Katja's blog. Continue on to see Teri's wonderful projects. A list of bloggers is found at the bottom of my blog.
My card and project this month highlight some fun, bright paper from Stampin' Up! called Sweet Symmetry. I love the color combinations in this set of Designer Series Paper (DSP): Bumblebee, Calypso Coral, Flirty Flamingo, Night of Navy, and Just Jade.
Thank you to fellow demonstrator Chris Slogar (buckeyeinklings.com) for her inspiration for this sweet card. Complete directions for constructing the card are found further down in my blog.


 Yay! Two pieces!


***
(Don't do what I did with my first attempt at this card!) This is what I mean about being careful with directional patterns: The back side also has a directional pattern.
 Look how the inside turned out with my first attempt at making this card. The design on the pocket is correct, but the pattern in the coral piece is not! Oops, I had to start over using different paper!)
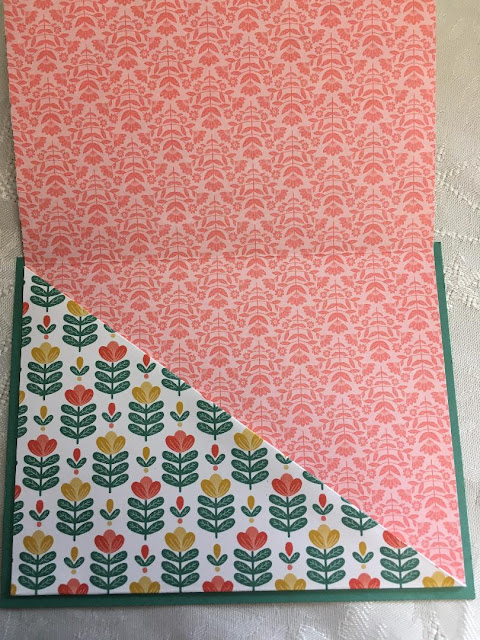


Card base: Night of Navy card stock 4-1/4" x 5-1/2"
Swirly Wreath: Night of Navy card stock and Seasonal Swirls Die Set
Calypso Coral zig zag embellishment: Basic Borders die set
Greeting: Sweet Strawberry stamp set and Tasteful Labels die set
DSP for front and inside: Sweet Symmetry 12" x 5-1/4"
The inside pocket contains an insert for a message.
Mat: Night of Navy card stock 4-1/2" x 3-1/2"
Message Piece:White cardstock 4-3/8" x 3-3/8"


Here are the directions for the card. I have used different DSP for this "practice" card.
1. Cut a piece of pretty patterned paper 5-1/4" x 12". Score on the long side at 4" and 8". You will need to be careful when using directional patterned paper. (See below for an example of what not to do!)
2. Score on the diagonal from the bottom left corner to the 8" score line.
3. Cut off the bottom corner leaving a 1/2" flap. Set aside the triangle for later use. Trim a small triangle off the flap for ease in folding.
4. Fold over the flap and glue it down.
5. Adhere a piece of Tear and Tape along the left side of the triangle piece.
***
At this point with my "real" card, I decided to add a bit of border (in years past we called this "rick rack.")
I placed a die from the Basic Borders set down the middle of a 1" piece of cardstock and ran it through my die cut machine.
This is what it looked like:
I snipped each end of the card stock and got this:
I glued them along the long side of the triangle pocket and the triangle piece for the front of the card.
***
6. Remove the top covering of the Tear and Tape and fold the triangle piece up to form the inside pocket.
7. Cut a piece of card stock 5-1/2" x 4-1/4".
8. Adhere the patterned paper pocket piece to the card stock.
9. Decorate as desired. I glued the triangle piece I had cut off to the bottom corner of the front.
(Don't do what I did with my first attempt at this card!) This is what I mean about being careful with directional patterns:
This is a strip of another piece of the Sweet Symmetry patterned paper. Notice the directional pattern.
***
On to my 3-D project: A very special thanks to my fellow demos Heidi Gartzman, Lolo, MT in the US and Sam Hammond Donald (pootles.co.uk) in the UK whose projects were the inspiration for this little backpack to hold candy treats or other small items. Theirs were adorable, and I had to have a go at making one of my own! I think it turned out beautifully! Fun! Next up: make ones for my two teenage grandsons as a "good luck in the new school year" treat package.
Sam's video for making the backpack can be found here(15) How To Make a Cardstock BackPack - YouTube . She used magnets to close the top and pockets, but I used 1/2" Velcro circles.
Side view:
Thanks for stopping by! Before you leave, please leave a comment for me and also at the end of the other stampers' blogs. The list of bloggers is found below. I always look forward to seeing what my friends make and what others say about our creations! We will be back next month with more cards and projects. I hope you will join us.
Stampin Friends:
- Jean Beaulieu (USA) - You are here.
Product List
Clicking on the product picture will take you to my online Stampin' Up! "shop." My August Host Code is
UGJ746CA. Thanks for using it when ordering online!
 |  | ||

 Designer Series Paper")


Gorgeous projects Jean! I especially love the card and how different it is with the separate message panel - it would be perfect to slip in a gift card too!
ReplyDeleteThank you, Teri!
DeleteGreat projects Jean - I especially love that card - am gonna have to case it for sure!
ReplyDeleteThanks, Maureen!
DeleteLove the card and that backpack is so cute! The directions for the card are very clear...I will definitely be making one!
ReplyDeleteThanks, Paula!
ReplyDeleteLove the fun fold card and I appreciate the directions and pictures! Always hard for me to figure those things out!
ReplyDeleteThank you, Melissa! I am never sure how much detail I should include!
DeleteGorgeous projects and thank you for the directions, will give this a go, thank you for sharing x
ReplyDeleteThanks, Jo!
ReplyDeleteWhat a fun Little bag!! Definitely will add this to my to do list
ReplyDeleteGreat use of papers!!!!
Thanks, Steph!
ReplyDeleteThe card and the backpack are gorgeous! The paper is so beautiful in these projects. Thank you a lot for sharing the measurements and instructions!
ReplyDelete