Stampin Friends 2020 Happy Holiday/Winter November Blog Hop

Welcome, Crafters!
Can it be November already? This is our last hop of 2020! This was my first go at blog hopping, and I have learned so much. Thanks, Stampin Friends, for all your help along the way.
This month's theme is Happy Holiday/Winter, and we are sharing some really special cards and 3-D projects with you. If you are following the blogs, you have come from Sue Vine's blog. At the bottom I have included a list of the bloggers. After mine, you will find a link to Kim's blog. Check out her wonderful creations!
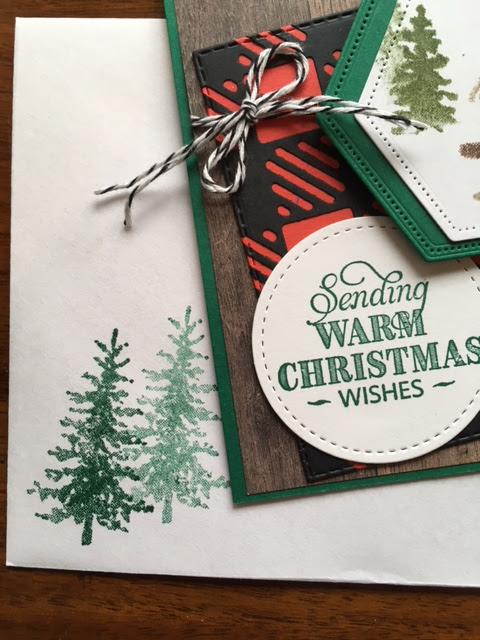
I grew up in a little town in northwest Montana (Eureka) called the "Christmas Tree Capital of the World." My dad was a Christmas tree "farmer." He worked throughout the year planting new trees, pruning the young trees, and preparing the older trees for harvest. He always wore a red and black plaid coat in the woods, and whenever I see buffalo plaid I think of him. I created this card and project with him in mind.
Here they are (card and covered junior legal pad notebook):

I have been making (and sending!) Christmas cards for more than 25 years and have an extensive collect of holiday stamps. It's hard for me to part with any. Every year I tell myself, "No new stamps this year. Use the ones you have." I DO use a lot of them, but... Stampin' Up! keeps producing new stamp sets that are irresitible! I have used five sets (see below for a list) for my card and project.
What I Used:
Base: Shaded Spruce card stock 8-1/2" x 5-1/2" scored and folded at 4-1/4"
Mat: Designer Series Paper (In Good Taste) 4" x 5-1/4"
To get the buffalo check, I used a piece of Basic Black card stock (5-1/2" x 4-1/4") and one of the dies in the Best Plaid Builder die set. I adhered it to a Real Red (5-1/2" x 4-1/4") piece. I trimmed it with a Stitched Rectangle die.
Focal Piece: Shaded Spruce card stock, Whisper White card stock, and Stitched Nested Labels dies, Stampin' Write Markers
Greeting: Rustic Retreat stamp set, Stitched Shapes dies

I was going for a soft country look, so immediately I thought of the Snow Front stamp set. I wanted the chimney to stand out on the log cabin brown, so I decided to try a technique that I hadn't used in a very long time--using markers to get multiple colors on the stamp.

Color each part with a marker, give the block a little huff of breath to remoisten the inks, and stamp. I love the soft watercolor effect. (This is a good technique to keep in mind for stampers with only a few sets of ink pads.) Once the whole scene was stamped, I used the Stitched Nested Labels dies to create the shape and adhered it to a Shaded Spruce piece. To give the scene a little pop, I mounted it on the card using Stampin Dimensionals. (One of my all time FAVORITE products!)

I used the brand new (adorable!!) Curvy Christmas stamp set on the inside:

I don't like naked envelopes! For this envelope, I used the stamping off technique. Stamp once with full strength ink and stamp a second time without reinking. (Another technique for stampers with a limited number of ink pads.)
I used the same color scheme and focal point on this covered notepad.


 |  |  |  | ||
 |  |  |  |  |  |
 |  |  |

")


Love this!!! This is so creative festive and fun! So happy you joined our hop your doing Amazon!
ReplyDeleteLove this!!! This is so creative festive and fun! So happy you joined our hop your doing Amazon!
ReplyDeleteLove this!!! This is so creative festive and fun! So happy you joined our hop your doing Amazon!
ReplyDeleteLove your card and your notepad cover. Very pretty and creative. TFS
ReplyDeleteJean - I love everything about your projects - how fun that your Dad was a Christmas tree farmer. :)
ReplyDeleteI love the country look on your card and notepad cover. Thanks for sharing.
ReplyDeleteLove that plaid, tfs your lovely creations
ReplyDeleteJean, your projects are gorgeous and I love that your dad was your inspiration. Your card and notepad cover have such a warm and cozy feel. Thank you for sharing the tutorial for the notepad cover, too. I have a feeling this is going to be one of my new favorite gifts to share with friends and family. The little pocket is the perfect touch!
ReplyDeleteYour projects are beautiful Jean and I love the inspiration story about your dad!
ReplyDeleteGreat job on your first blog hope. Love your winter scene on your cards and journal. Thanks for sharing.
ReplyDeleteI agree! It's so hard not to buy anything new each holiday season. But, it's all so fun! thanks for sharing your projects.
ReplyDeleteYour town sounds like a Hallmark movie town, I'm jealous! And on that note, I just love your legal pad cover and your use of the Curvy Christmas stamp set.
ReplyDeleteI love these, especially the card! Great scene and the buffalo plaid is perfect as the background base. I may have to case it!
ReplyDelete