Stampin Friends 2020 Happy Holiday/Winter November Blog Hop
Welcome, Crafters!
Can it be November already? This is our last hop of 2020! This was my first go at blog hopping, and I have learned so much. Thanks, Stampin Friends, for all your help along the way.
This month's theme is Happy Holiday/Winter, and we are sharing some really special cards and 3-D projects with you. If you are following the blogs, you have come from Sue Vine's blog. At the bottom I have included a list of the bloggers. After mine, you will find a link to Kim's blog. Check out her wonderful creations!
I grew up in a little town in northwest Montana (Eureka) called the "Christmas Tree Capital of the World." My dad was a Christmas tree "farmer." He worked throughout the year planting new trees, pruning the young trees, and preparing the older trees for harvest. He always wore a red and black plaid coat in the woods, and whenever I see buffalo plaid I think of him. I created this card and project with him in mind.
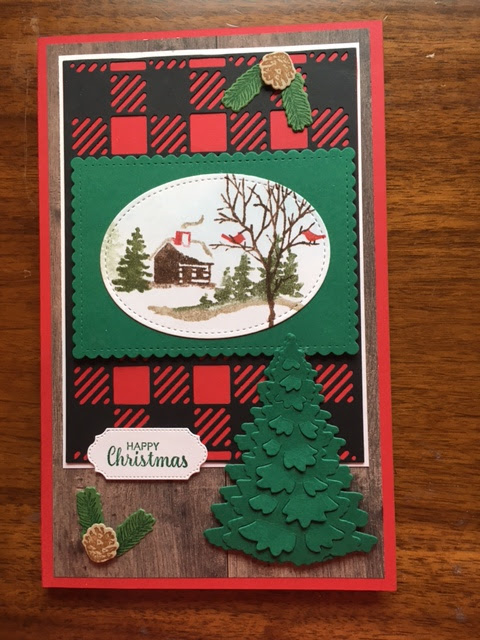
Here they are (card and covered junior legal pad notebook):
I have been making (and sending!) Christmas cards for more than 25 years and have an extensive collect of holiday stamps. It's hard for me to part with any. Every year I tell myself, "No new stamps this year. Use the ones you have." I DO use a lot of them, but... Stampin' Up! keeps producing new stamp sets that are irresitible! I have used five sets (see below for a list) for my card and project.
What I Used:
Base: Shaded Spruce card stock 8-1/2" x 5-1/2" scored and folded at 4-1/4"
Mat: Designer Series Paper (In Good Taste) 4" x 5-1/4"
To get the buffalo check, I used a piece of Basic Black card stock (5-1/2" x 4-1/4") and one of the dies in the Best Plaid Builder die set. I adhered it to a Real Red (5-1/2" x 4-1/4") piece. I trimmed it with a Stitched Rectangle die.
Focal Piece: Shaded Spruce card stock, Whisper White card stock, and Stitched Nested Labels dies, Stampin' Write Markers
Greeting: Rustic Retreat stamp set, Stitched Shapes dies
I was going for a soft country look, so immediately I thought of the Snow Front stamp set. I wanted the chimney to stand out on the log cabin brown, so I decided to try a technique that I hadn't used in a very long time--using markers to get multiple colors on the stamp.
Color each part with a marker, give the block a little huff of breath to remoisten the inks, and stamp. I love the soft watercolor effect. (This is a good technique to keep in mind for stampers with only a few sets of ink pads.) Once the whole scene was stamped, I used the Stitched Nested Labels dies to create the shape and adhered it to a Shaded Spruce piece. To give the scene a little pop, I mounted it on the card using Stampin Dimensionals. (One of my all time FAVORITE products!)
I used the brand new (adorable!!) Curvy Christmas stamp set on the inside:
I don't like naked envelopes! For this envelope, I used the stamping off technique. Stamp once with full strength ink and stamp a second time without reinking. (Another technique for stampers with a limited number of ink pads.)
I used the same color scheme and focal point on this covered notepad.


