Welcome to our May blog hop.
I hope you like the cards and projects we have made for the special guys in our lives. At the bottom of this blog there is a list of the talented paper crafters that are participating this month. Clicking on a name will open her May blog post. We love it when you take the time to comment!
There are several people in my family who are golfers, so this month I created a golf themed birthday card. I had seen many examples of side step cards on Pinterest and decided it would be perfect for this card.
I had never made a side step card before, so I searched YouTube. Thanks to Splitcoaststampers and Beate Johns for their side step card video found here. What did we do before YouTube was invented???? (LOL I am sure that many of you can't even imagine that far back in time, but this Baby Boomer can!)
My steps: (these steps could be easily changed to fit your style.)
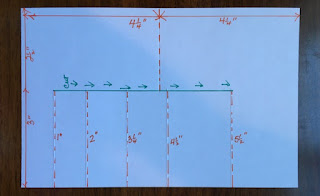
1. Cut and folded the white card stock according to the directions in Ms. Johns' video.
here is the template for cutting and folding:
3. Randomly stamped some grass (retired set).
4. Stamped the golfer (Clubhouse stamp set)in Memento ink and colored him with Stampin' Blends. Used the framelit from the set to cut the golfer out. Adhered him with dimensionals.
4. Stamped the golfer (Clubhouse stamp set)in Memento ink and colored him with Stampin' Blends. Used the framelit from the set to cut the golfer out. Adhered him with dimensionals.
5. Stamped the large pine trees (Rooted in Nature stamp set) in Garden Green. I didn't want the trunk to be green, so I used a masking technique:
a. cover the trunk with washi tape and tap the stamp on the ink pad
b. remove the washi tape (I have forgotten this important step a number of times!)
c. it's MESSY so throw it away!
e. die cut the stamped image (to remove the white border left by the die, I sponged over the border and the branches)
5. Adhered the trees. Added some grass clumps (dies cuts in the Clubhouse set)
6. Added a sand trap, pond, and distant putting green. Framelit for the flag is included in the Clubhouse set.
7. Used a retired set of framelits to cut the tree line in the far distance.
8. Stamped the greeting (Clubhouse Stamp set) and punched it with the Classic Label Punch. (This punch is a MUST have!) Then mounted it on a strip of card stock and adhered it to the front with dimensionals.
8. Stamped the greeting (Clubhouse Stamp set) and punched it with the Classic Label Punch. (This punch is a MUST have!) Then mounted it on a strip of card stock and adhered it to the front with dimensionals.
Every golfer in my family would LOVE a free round of golf, so my project is a gift card holder. Thanks to Lisa Curcio for her step by step YouTube video found here.

This is what it looks like inside:
Bloggers this month:
Jean Bolen Beaulieu -You are here. I hope you will check out Teri's awesome projects next.
Please take the time to comment below. I am a beginning blogger and always welcome comments!
Below are some of the Stampin' Up products I used for my card and gift card holder. The Clubhouse stamp set, The Golf Cub dies, and the Country Club patterned paper are being retired and will no longer be available after the end of May. If you can't live without this set, act quickly! To shop with me, click on the image of the item below, and you can access my online "store."
Until next time, stay healthy...


