Thursday, January 27, 2022

January 2022 Stampin Friends Blog Hop


Welcome Crafting Friends!  


My Stampin Friends and I are beginning another year of blog hops.  This month’s theme is LIFE'S SPECIAL OCCASIONS.  We are getting a jumpstart on making cards and projects for special occasions we may have this year.  If you are following along the hop, you have arrived from Steph's blog. Be sure to read through my blog, comment below and continue to Sue's blog. If you get lost along the way, you can find a list of Blog Hoppers at the end of each Blog. Be sure to check out their creations!  Here are the projects I created for this month’s hop: 

A Happy Ravioli Day/Anniversary Card


On March 20 my brother and sister-in-law are celebrating their wedding anniversary, their daughter and her husband are celebrating their first anniversary AND it's National Ravioli Day here in the U.S!  (Here nearly every day has some little commemoration:  National Hot Dog Day, National Pizza Day, etc. LOL).  My husband comes from a large Italian family, and they celebrate special occasions with homemade RAVIOLI! Making them is a day long process, but well worth the wait.  They are DELICIOUS.  The recipe is a well-kept family secret!  


     A mini photo album--Ravioli Making Day is always a fun occasion, and we take lots of family pictures which will be included in this album.


My hubby makes his own pasta, filling, and 
sauce.


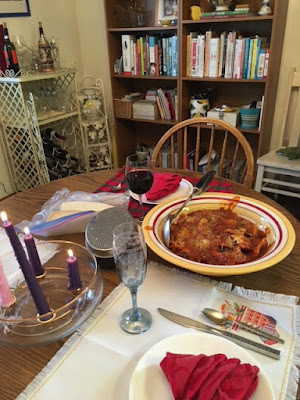
The table is set, and mouths are watering!


                                   YUMMY!


Direction and Dimensions
Card:  Basic White cardstock for the base 5 1/2" x 8 1/2" scored at 4 1/4"
Basic Black mat 4 x 5 1/4"
Tag from Tailored Made Tags die set
Random stamping of background from What's Cookin? stamp set*
Accent pieces cut from the Cookin' die set*
Words all in Memento Black ink with A Wish for Everything stamp set

Mini Album:  
Album Front Cover:  Basic Black 5 1/2" x 8" Score one end at 1/2"
Album Back:  Basic Black 5 3/8" x 7 7/8" (The back is slightly smaller than the front, so it won't be visible when the album is closed.)  Score one end at 1/2".
Real Red mat:  7 1/4 x 5 1/4"
Basic Black mat: 5" x 4 1/2"
Basic White focal piece:  I typed this on my computer and cut it to 4 3/4" x 
4 1/4"
Clear Envelopes (photo holders):  6-10 clear envelopes (Available from Stampin' Up!  Find the link to my online store below.)
Basic White Envelope Cover:  4 3/4 x 2" scored at 1"  

Instructions:
1.   Prep the score lines of the cover pieces.  (I put a sticky note on each, so I would know which is the top cover.) Apply a strip of tear and stick adhesive along the flap of the top cover piece. 


2.  Overlap the 1/2" flaps and adhere them together. (The top flap should cover up the back flap.)
3.  Center the red mat and adhere it to the front cover.
4.  Decorate and/or stamp the focal piece and adhere it to the black mat.
5.  For the clear envelope piece, peel the plastic strip off the clear envelope to expose the glue.
6.  Center and adhere it inside the envelope cover.  (The top of the clear envelope flap should be flush with the score line of the envelope cover.)


7.  Continue adhering the clear envelopes one after the other on top of the first one.  Keep them lined up with the first one.


8.  Add tear and stick tape to the inside of the of the envelope end cover as shown in the picture above.  Then close and secure it on top of the stack of clear envelopes.
9.   Punch holes through all layers. Insert twine or ribbon and tie a bow. 
10. Put tear and stick tape on the back of the envelope cover, and then adhere it to the back of the back cover piece. (Flush to the edge of the glued flap.)


This mini album is so versatile. The size can easily be adjusted.  It can be made in any color card and decorated to suit any occasion.  It can be a mini scrapbook to highlight a specific event (a high school activity, First Communion, 50th wedding anniversary, a birthday party, the list is endless!) It would make a perfect little gift for grandparents filled with pictures of the grandchildren.  Give it a try!

Thanks for stopping by and having a look at my creations.  I'd love for you to leave a comment to let me know what you think.  For more crafting inspiration, click on the links below.

 
*Stamp set and die set can be purchased separately or in a bundle with 10% savings.  See my online store below.


Product List

Friday, November 26, 2021

Stampin Friends November Blog Hop--Celebrate the Season


 Welcome Crafters
     This is the last blog hop of 2021 for my stampin friends and me!  I'm so glad you have joined us to see what we have created for this month's theme:  Celebrate the Season.  If you are "hopping" from blog to blog, you may have come from Barb's blog.    I hope you will hop along to see Maureen's seasonal creations next.  There is a list of the bloggers with their links at the end of my blog. 

     I made a card and a gift card holder.  I used some items that can be purchased now from the Annual Catalog or the August-December 2021 Mini Catalog (highlighted in red ink) and some retired items that are no longer available.

     Recently I participated in a craft show selling Christmas cards, gift tags, money envelopes, gift card holders, and stocking stuffers.  After the show, I began cleaning my craft room--the scraps of pretty paper were everywhere!  This is how I store my 6 x 6" pretty designer series paper and their scraps:
 The smaller scraps go into a clear envelope.

When I get a new pad of 6 x 6 paper, I make a box for it.  I create a label with the name of the paper and the Stampin' Up! colors that are in the paper.  The clear envelope with the scraps goes in the front.  The boxes are stored in photo boxes for quick and easy access.


     What to do with all those scraps?  Making a background "quilt" using the scraps is one of my favorite ways to use them.
    I began this time by choosing various size strips of the Gingerbread and Peppermint paper and laying them out.  It was fun to see how many ways there were to organize the colors and designs.  Once I was happy with the look, I began gluing them to a 4 x 5-1/4" piece of Cinnamon Cider card stock.

     After making 5 rows, I stamped the tiny peppermints with Cinnamon Cider ink onto the rest of the cardstock.  I wasn't happy with the result.  The pattern was too busy, so I cut all but an inch off, and mounted it onto a piece of white card stock.  Then I trimmed that whole piece and embossed just the white part with the Hammered Metal Embossing Folder.  Then I adhered it to a 4 x 5-1/4" Real Red mat.  
    To make the "iced" gingerbread cookies, I cut the outlines from more of the Cinnamon Cider card stock, and then adhered the white icing pieces.  Gluing those delicately cut pieces was a snap using our Adhesive Sheets!  To finish it off, I added ribbon, baking twine. a small greeting, and rhinestones that I colored with my Poppy Parade Blends.


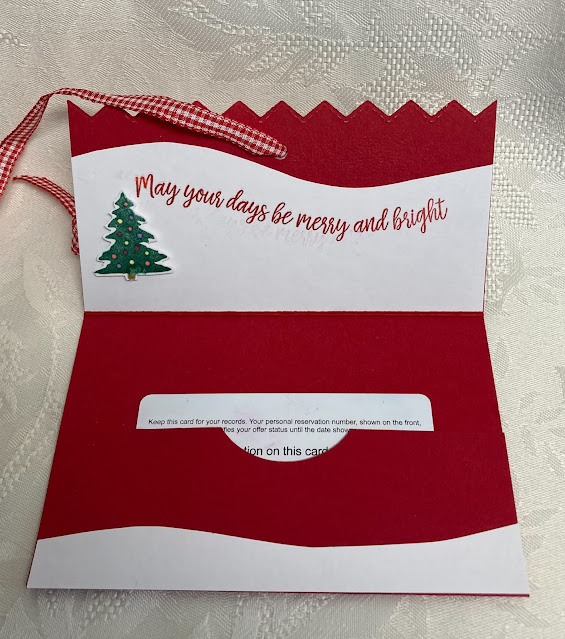
Inside


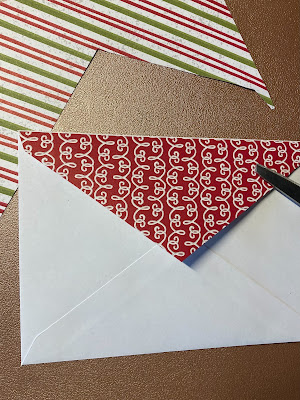
I like to add pretty paper to the envelope flap.  I put glue close to the edge all around the envelope flap on the RIGHT side of the flap.  I put the DSP on right up to the very top.
When it's dry, I flip it over and trim the excess DSP.

Here's another look at the card and envelope:


The gift card holder
     I rarely can bring myself to get rid of any of my Christmas stamp sets, so my collection is large!  I used several retired items in this gift card holder.

 Directions:
Cut Real Red Card Stock Base 5" x 7-3/4" and score at 1-3/4" on one end.  
Rotate it 180 degree and score at 2-3/4".  
Using the "zig zag" die in the Basic Borders Die Set, trim about 1/4" from the edge of the LONGER flap.
Cut Basic White Card Stock for the background 2" x 4-3/4".


Details:
1. Stamp the curvy tree line. (Shady Spruce)
2. Sponge lightly a blue sky. (Misty Moonlight)
3. I used Smoky Slate ink and the contour stamp in the Snow Front stamp set to create an illusion of snow.  I wanted a very light image, so I "stamped off" on scratch paper twice and then stamped the image on the white card stock.
4. Die cut a tree in Shady Spruce card stock.  The star is from the Stitched Stars die set. 
5. Punch a hole for the ribbon closure.

6. Cut the white greeting piece 2 x 5".  
7. Stamp a greeting and decorate as desired.  (My tree came from an old Paper Pumpkin kit.)  
8. I free hand cut the curve.  The scrap I cut off usually becomes the snow at the bottom of the pocket.  (You may notice that my piece at the bottom doesn't really matchup with the greeting piece.  Oops--I misplaced my scrap and had to cut another one.)
9. Use a circle punch to create the finger opening BEFORE adhering the sides of the card pocket.

I hope you like my projects and comment below.  Thanks!

Here are my stampin friends and their links: 


Retired Products used:
Mini Curvy Keepsake Box Dies
Curvy Dies
Curvy Christmas Stamp Set
Itty Bitty Christmas Stamp Set
Snow Front Stamp Set

Current Products Used:  
If you would like to purchase any of these items, click on the blue words and you will be directed to my online "store."  Thanks so much!


Friday, October 22, 2021

Stampin Friends October Blog Hop--Showing Gratitude


Welcome, Crafting Friends

My Stampin Friends and I publish a Blog Hop once a month following a theme where we showcase a card and a 3-D project.  If you are following the Blog Hop, you may have come from Barb's blog.  Aren't her projects super? You will find  a complete list of the Stampin Friends and their blog links at the bottom of my post.  


This month's theme is Give Thanks.  

It's time to celebrate and give thanks to special people in our lives.  Here in the US, we celebrate two holidays in November that fit this theme--Veteran's Day (Nov. 11) and Thanksgiving (Nov. 25)  I am sending a big thank you to all our American service men and women--serving now or retired--who have sacrificed or our country.  For my projects, I chose to honor and thank a very special Army veteran--my husband of nearly 50 years. 

I had so much fun making this Veteran's Day card and the little Thank You for all You Do treat box! I have used a variety of stamp sets and dies, some old, some new, that fit him perfectly!   Items in the current catalogs will be listed at the bottom of the blog.

Patriotic stars and stripes in red (Real Red,  white, and Blueberry Bushel,  a retired color)
(Quilt Builder die set--retired)
Grateful (Sparkle of the Season)


Star Blast dies (retired)
Inside message (Inspired Thoughts)

Here is the little treat box (3" x 3" x  3/4") I made for him.   I am going to fill it with cherry flavored Lifesavers candies.  

The sentiment and anchor stamps are from the April 2018 Paper Pumpkin kit.

Back view:
Thanks (April 2018 Paper Pumpkin kit.)
Thank You (Pansy Patch)
The Little Things...(Pansy Patch)
Stars (Curvy Christmas)

Thanks to Julie DiMatteo (Paper Pixie) for her You Tube box making video. (Title:  Poinsettia Box 9/18/20) 

Directions:
1.  Cut cardstock to 5 1/2" x 8 1/2"
2.  Score on the long side at 3 1/8", 4, 7 1/8, 8"
3.  Rotate and score on the short side at 7/8", 4, 4 7/8"

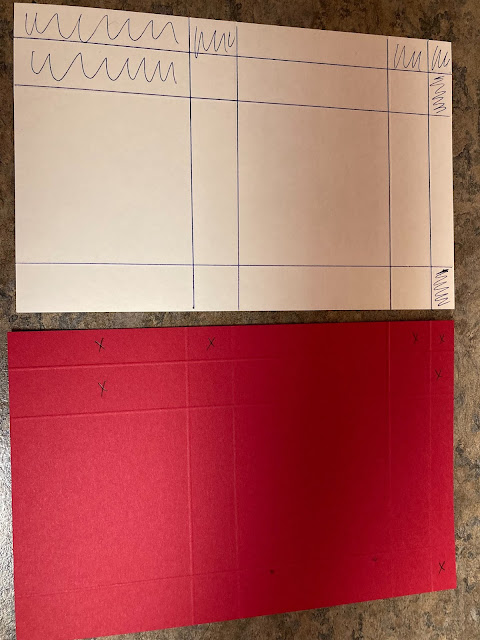
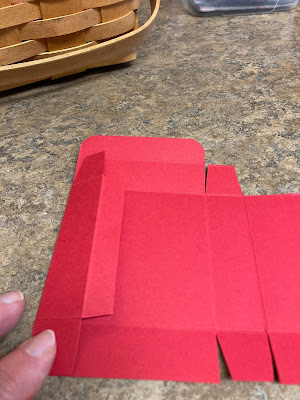
When making a project like this, I always make a template for my file.  Here is the template showing the sections that I will cut off alongside the piece of scored cardstock.  I marked the sections of the cardstock that will be trimmed off.

4.  Fold and burnish on all the score lines.
5.  Cut out the marked sections.
6.  On the long edge cut on the three score lines stopping at the horizontal score line creating tabs.  


I like to fold the sides under and out of the way when I miter the sides of the tab.
7.  Rotate the cardstock to the other 8 1/2" side.  Cut to the second horizontal score line creating the tabs.  Miter all the tabs. 

8.  Another tip: put the cardstock piece over the top of the original template before continuing to make sure you have cut correctly.  The remaining piece at the top will be the tuck-in lid for the box.  Round the corners for easy closing.
8.  Glue in place the 3 x 3 designer series paper pieces.

9.  Use a circle punch to cut a half circle finger hole.


10.  To adhere the sides, fold in like so:


11.  Put glue on the 1/2" flap.
12.  Now fold the right side over to meet the flap with the glue.
13.  The two pieces should match up.  Press the right side down onto the glue flap.


For the bottom:
Apply glue to side panels, and the back panel.  Then fold front panel over the back panel.  The liquid glue gives some "wiggle" time to work the corners in place.

Top view:

(April 2018 Paper Pumpkin Kit)

Side Views:

(Pansy Patch)


(Many Messages)


(Layering Circles dies, Classic Label punch--retired)

Thanks for stopping by.  I hope you comment below and let me know how you liked my projects.  Please continue on to see what Maureen has made.  You will find lots of paper crafting inspiration in her blog!