Friday, July 23, 2021

Stampin Friends 2021--July Blog Hop--Just Rewind & Redo


Welcome, Crafting Friends!

It's time for my Stampin' Friends and I to share our latest cards and 3-D projects. Our theme this month is: Just Rewind & Redo. We are looking back to past projects and techniques, remaking those favorite projects, and giving them a fun update using new products. If you are following our blog hop, you may have come from Jo's blog. For more inspiration I hope you will continue on to Katja's blog. A list of bloggers and their links are found at the end of my blog. We appreciate comments posted at the end of each person's blog. Thanks!

Sometimes I have trouble with card design, so I often turn to Pinterest for Card Sketches. The sweet sketch below is one of the very first one I pinned. I used it for one of the first classes I held after becoming a Stampin' Up! demonstrator five years ago. It's still one I use often! The attendees at that class were beginners at stamping. They had such great success with this simple card, they were eager to come to another class. Some of them are still stamping with me!


This is the card I made for this month's blog:


I used Pansy Petals designer series paper for the background and used other In Colors for the banners and flower "button."  Each banner has two layers.  The underlayer is from the In Colors DSP set and the top layer is some some shimmery vellum.  I offset the layers to show a bit of the underlayer. The photo below gives an idea of its pretty shimmer.


Rather than use a button for the twine embellishment, I cut a flower using the Pierced Bloom Dies and punched two holes for the twine.  I love the look of the pierced flower!


My simple 3-D project is one I made after watching a YouTube video made by Caroline Helwigh Wright  a former demonstrator in the UK.  I usually give a little chocolate treat to my class attendees, and this is a quick and easy treat bag to make using a 6 x 6" piece of pretty paper. Here is the link to watch Caroline make the bag:   (532) Ombre Gift Pouches - Video Tutorial with Colourful Seasons DSP - Stampin' UP New Catalogue Week - YouTube
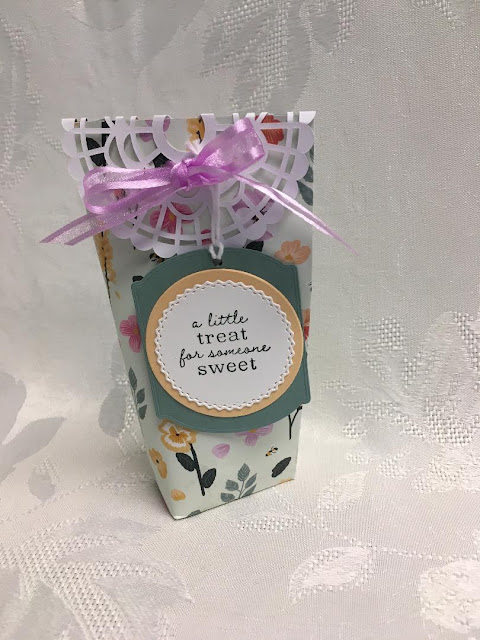


The doily and the stamp set I used for the greeting are no longer available from Stampin' Up,  but the rest of the products can be found in the list at the bottom of my blog.
Here is the template I used to make the bag. (I used some scratch paper, so it's a little messy, but you get the idea....)

 
1.  Score at 1 inch.  This is the bottom of the bag, so if you are using paper with a directional pattern, you will need to position it properly.
2.  Turn the paper and score at 1-3/4", 2-3/4 ", 4-1/2" stopping at the 1" score line. 
 3. Score at 5-1/2" all the way down the side. 
4.   Cut away the shade area. 
5.  Keeping the paper slightly rolled, adhere the tab to the other side.
6.  To make the bottom of the bag, cut on the short score lines to the 1" score line.  Fold the side flaps in first. Fold the other flaps in, apply adhesive to the last flap.
7.  Decorate as you wish.

Below are the names of my stampin friends.  Click on each name to go to her blog.  


1.. Kim Lamos - 

Here are the current products I used in my card and project.  If you would like to shop with me, simply click on the item.  You will automatically be linked to my online "store."

Thanks so much for stopping by. Have a wonderful rest of July, and I hope to see you next month!
Jean




Friday, June 25, 2021

2021 Stampin Friends Blog Hop Dream In Colors


Welcome Crafting Friends!  

We are a group of paper crafters who publish a Blog Hop every month sharing our hand made cards and projects.  If you are following the blog, you may have come from Teri's blog.  Weren't her projects beautiful?  I hope you will hop to Jo's blog by clicking on her name in the list found at the bottom of this blog.  Please leave a comment for each of us.  It's so fun to see what you think of our creations!
 
This month's theme is Dream In Color.  Every year Stampin' Up! adds five new colors to their color collections and call them In Colors.  These colors are available for only two years.  This year's additions are Soft Succulent (sage), Polished Pink (vivid pink), Fresh Freesia (a shade of purple), Evening Evergreen (dark forest green) and Pale Papaya (soft light orange). 

***

I really like making special orders, and recently a friend came to me with a very special request.  Her teenage granddaughter, a novice sewer, had stitched a quilt, entered it in a competition, and had won a blue ribbon for her effort!  My friend asked me to make a congratulatory card and a gift box for her granddaughter with a sewing theme.  I immediately thought of the Stitchery stamp set (pg. 22 in the Annual Catalog). It was very easy to create the pattern of stitches for the background of the card and the inside of the gift box lid.  I used the A Grand Kid stamp set (pg. 54) for the sentiments.  Since we were going with a sewing theme, I used the Playful Alphabet dies to cut the SEW, SEW, SEW letters to be included with the so proud of you.  All of the colors are the new In Colors.  I used the Lovely Labels Pick a Punch for both the front and inside greetings.  


***
 On to the box... 
It  needed to be large enough to hold a few sewing supplies AND a gift card at her favorite fabric store.  The Scalloped Kraft Treat Box was just the thing (pg. 137 in the Annual Catalog).  These food safe boxes (3-1/2" x 3-1/2" by 2-1/2" come in a set of eight.  Gold foil dots cover the lid and the box.  Here is what they look like right out of the package.


The scored panels fold easily to make the lid and box without any adhesive.


 ***

Here is the top view.  I made a faux "quilt square" by cutting four squares from scraps (In Colors) and adhering them to a 3" x 3" piece of  Evening Evergreen card stock.  I used my Alcohol Markers to color the Square Vellum Doily (pg. 135 in the catalog).  Polished Pink ribbon, a little tag with a sentiment from the Sweet Strawberry stamp set, and mats of In Color cardstock completed the top.


Here is a side view.  Each side has an Evening Evergreen mat and a strip of designer series paper matching the pieces in the "quilt piece" on the lid.


Here's a peek inside the box.

T

***
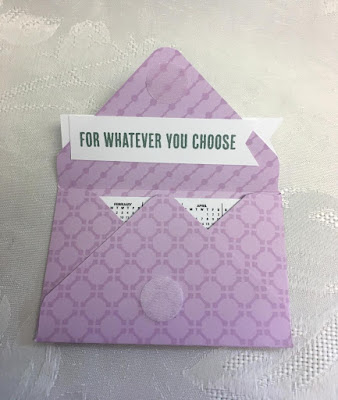
I used my Envelope Punch Board (a retired product that I have used over and over!) to make the gift card envelope.  I used some small Velcro stickers to hold the card closed.  The sentiments are from a retired stamp set.


Friday, May 28, 2021

Stampin Friends May 2021 Blog Hop: Masculine


Welcome Friends!

It's time for another blog hop for my stampin friends and me.  We are a group of card makers who share a card and a project each month following the monthly theme.  Our names are listed at the bottom of my blog.  You may have just have come from Katja's blog.  Teri's blog follows mine in the list. 
Just in time for Father's Day next month in the U.S., the theme this month is MASCULINE.  I once asked my husband what he'd like in a masculine card.  Here are his suggestions:  NO frills, NO ribbons, NO flowers, PLAIN and SIMPLE, wildlife OK, sports OK,  tools, OK.  I think the one I created this month would satisfy him.


I used a new stamp set called Etched in Nature for this card.  I stamped the image with Memento black ink and colored it with my Stampin Blends alcohol based makers.  I sponged a little blue above and beside the bird.  Then it was just a matter of adding a few layers for accent.  Plain and simple, no flowers, no frills!
I followed the same plain and simple formula with the gift card holder.  I chose to make an origami fold gift card holder. 


Searching You Tube and Pinterest, I found a multitude of origami samples and how to do them.  The Paper Pixie has a  video on YouTube that I found to be the easiest to follow.  Thank you, Julie!
Here are my steps:
1.  Cut a piece of patterned paper 7" x 10".
2.  Score the 7" side at 1-3/4", 3-1/2", and 5-1/4".
3.  Score the 10" side at 2-1/2", 5", and 7-1/2".
4.  Cut a piece of patterned paper for the insert 4-7/8" x  3-3/8" and fold it in half.
5.  Fold according to the following directions. (I chose a piece of patterned paper, that wasn't masculine on both sides.  The difference in the front and back patterns will make the folding easier to "see.")

Position the 7 x 10' paper lengthwise with the 7in. at the top and bottom.  Fold the left side to the center score line and burnish.


Fold the right side in on the score line to meet the other flap in the middle and burnish

Fold all four corners up to the fold line


Keep the corners folded and bring the sides to the center


Keeping it folded, turn it over


Using the score line, fold the bottom up even with the middle score line


Fold the top down to meet the bottom flap 


Here is the insert folded and ready to go.
 Once this is in place, it will keep the gift card holder together.
Insert it under the top and bottom flaps all the way until it is flat with the card holder base.


It should look like this.  Now fold the whole thing in half and burnish well to get a sharp crease.

Here is the front with the fold at the top.


You will see the line where the flaps meet in the middle.  If I were making a feminine card, I would adhere a ribbon all around the gift card covering the seam and tying a bow to keep the gift card holder closed.  HOWEVER, my hubby said NO RIBBONS on a masculine card!  So.....this is how I covered the seam.  
I cut a strip of patterned paper long enough to fold in half and cover the seam on front and back and extending past the bottom of the card holder. 

I
I decorated the inside and added a small Velcro circle to keep it closed.  

Here are the card and gift card holder.  I hope you like my creations.  Be sure to click on the names below to see my stampin friends' awesome creations.  We love to hear what you think of our projects, so please take a minute to add a comment.  Thanks!  Happy Crafting!
Jean